Get started with EliteSocialHub
User Panel Overview
The User Panel in EliteSocialHub provides a streamlined and user-friendly dashboard designed to give users full control over their social media management and account activities.
Below is an introduction to the key components and features of the User Panel:
Dashboard
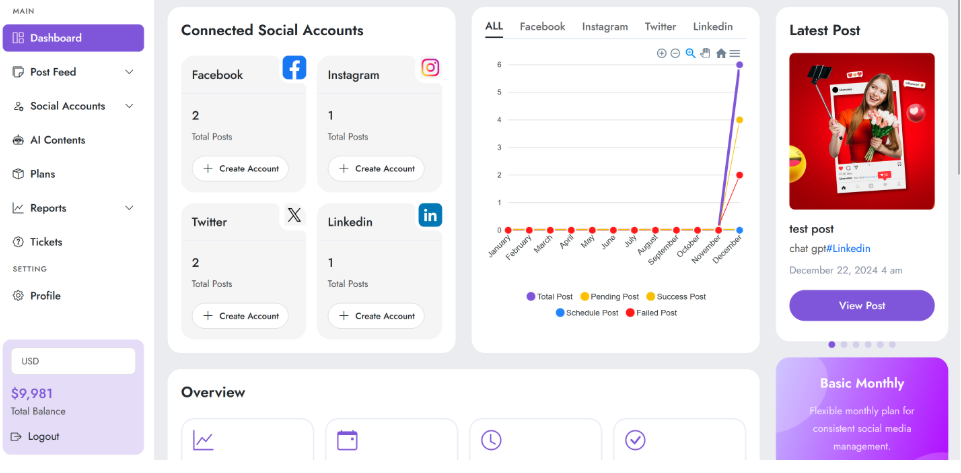
The dashboard serves as the central hub, offering an overview of connected social accounts, post analytics, and recent activities:
Connected Social Accounts: Displays the status and activity of linked accounts such as Facebook, Instagram, Twitter, and LinkedIn. Users can add or manage accounts directly.
Post Performance: A graphical representation of post metrics, including total posts, pending posts, successful posts, and failed posts, categorized by platform and timeline.
Latest Post: Highlights the most recent post with details like the platform, caption, and time of posting.
Post Feed
View, create, and schedule posts across multiple social media platforms, ensuring timely content delivery and efficient campaign management.
Social Accounts
Manage linked social media profiles, add new accounts, or configure platform-specific settings to optimize performance.
AI ContentsAccess AI-powered tools to create engaging content tailored to specific needs, such as captions, blog posts, and ad copies.
Plans
View subscription details, upgrade or downgrade plans, and explore available features for each plan.
Reports
Analyze detailed performance metrics and insights to refine social media strategies and track progress effectively.
Tickets
Submit and manage support tickets to resolve any issues or queries efficiently.
Profile and Settings
Update personal details, adjust settings, and manage account security for a seamless experience.
Quick Actions
Total Balance: Displays the user's current balance, enabling them to manage payments and services.
Logout: Securely sign out of the system.The EliteSocialHub User Panel is designed to simplify social media management, empower users with insights, and ensure a smooth user experience across all features.
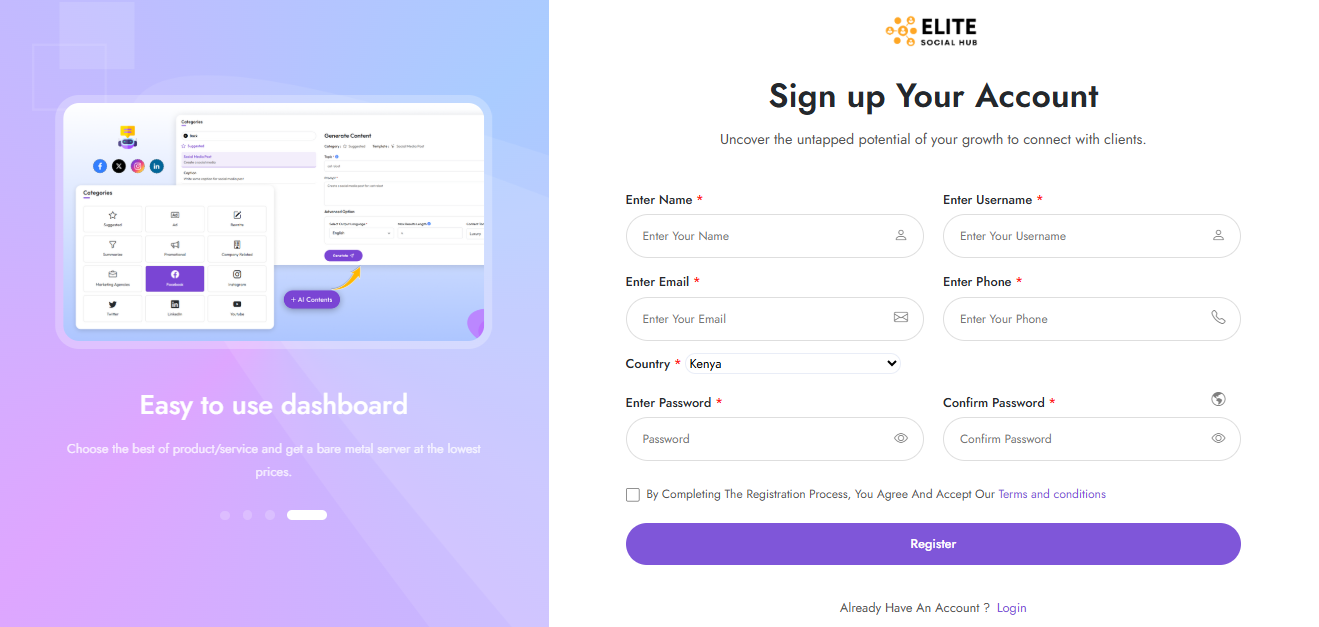
The Sign-Up/Registration New Account provides a user-friendly interface for new users to create an account on the EliteSocialHub platform.
It allows users to register quickly while ensuring all necessary details are collected for a smooth onboarding experience. Below are the key components:
Enter Name: Input the full name of the user.
Enter Username: Choose a unique username for account identification.
Enter Email: Provide a valid email address for account verification and communication.
Enter Phone: Enter a phone number for additional verification or support.
Country: Select the user’s country from the dropdown menu (pre-filled with a default country if applicable).
Enter Password: Create a secure password for the account.
Confirm Password: Re-enter the password to confirm and avoid errors.
Terms and Conditions: Agree to the terms and conditions to proceed with the registration process.
Click on the Register button to complete the sign-up process.
Use your Google account for quick registration.
Register using your Facebook account.
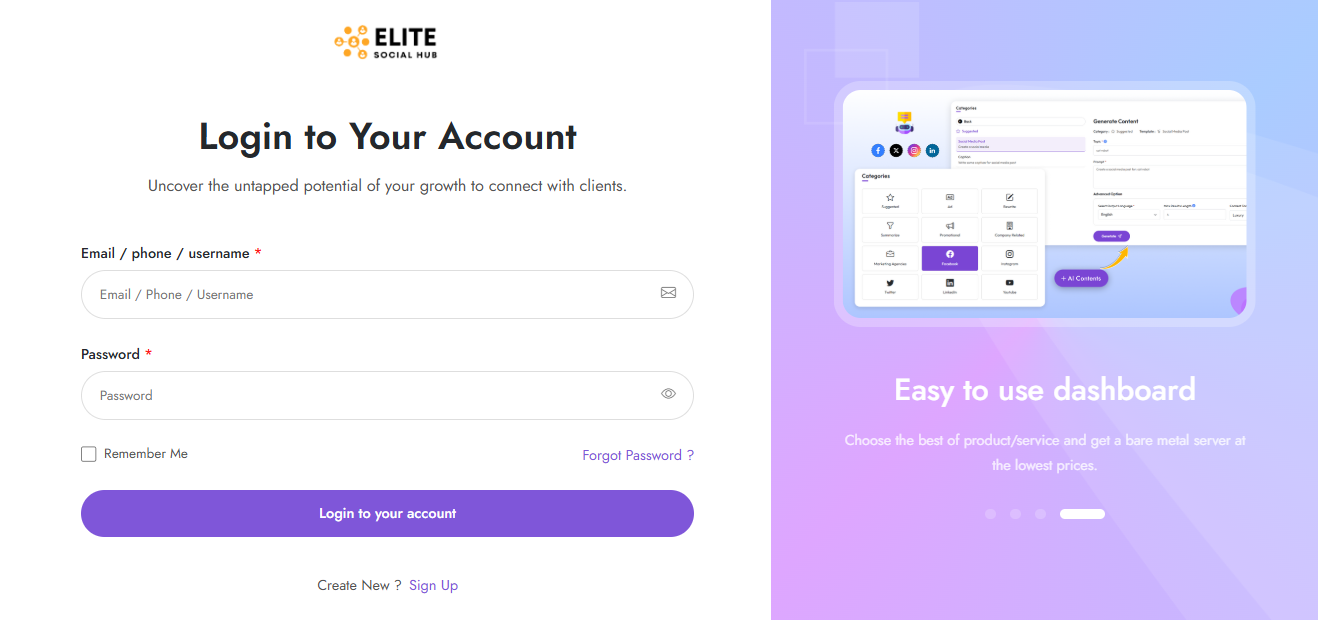
If the user already has an account, they can click on Login to navigate to the login page.


Connect Social Account
The EliteSocialHub platform allows users to seamlessly connect their social media accounts for efficient management and automation. Follow the steps below to connect your social accounts:
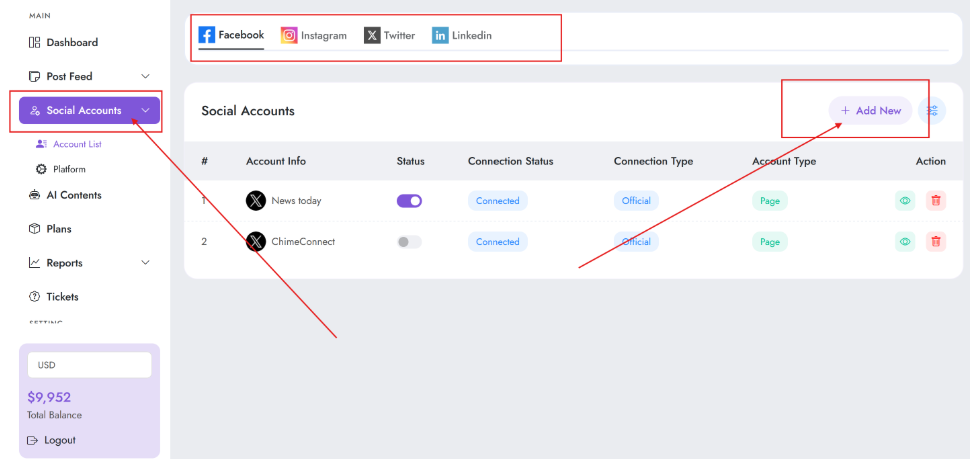
From the left-hand sidebar,
click on Social Accounts under the Main section.
Click on Account List to view and manage your connected accounts.
Click the + Add New button in the top-right corner of the Social Accounts page.
Select the social media platform you wish to connect (e.g., Facebook, Instagram, Twitter, or LinkedIn).
After selecting a platform, you will be redirected to the respective platform’s authentication page.
Log in with your social media credentials and authorize EliteSocialHub to access your account.
Once connected, you can configure account-specific details such as:
Status: Toggle the account’s status to enable or disable its activity.
Connection Type: Ensure the connection is Official for full functionality.
Account Type: Specify if the account is a Page, Profile, or other type.
All connected accounts are displayed in the Social Accounts list with their respective details:
View: Click the Eye Icon to view account information.
Delete: Click the Trash Icon to remove the account if no longer needed.
By following these steps, you can easily connect and manage your social media accounts on the EliteSocialHub platform, ensuring seamless integration and improved workflow.
Subscribe to a New Plan
How to Subscribe to a New Plan or Upgrade an Existing Plan
The EliteSocialHub platform allows users to easily subscribe to a new plan or upgrade their existing plan to access enhanced features and capabilities. Follow the steps below:
On the left-hand sidebar, click on Plans.
You will be presented with the available plans categorized by duration: Monthly, Yearly, and Unlimited.
Each plan card includes key details such as:
Price and duration of the plan (e.g., $29/month for Basic Monthly).
Included features such as the number of social profiles, total posts, AI templates, and word tokens.
Compare the plans (all plans) and choose the one that best fits your requirements.
If you are not subscribed to any plan, click the Subscribe button on the desired plan.
Follow the on-screen instructions to complete the payment process.
Once payment is confirmed, the plan will be activated, and its features will become available.
If you are already subscribed to a plan and want to upgrade, locate the plan you wish to switch to.
Click on the Subscribe or Upgrade button (e.g., if you’re on Boostrap Monthly and want to switch to Accelerate Monthly).
Follow the payment process. The system will automatically adjust the billing based on your current plan’s remaining duration and the upgrade.
Your currently active plan will display a Running label for easy identification.
After subscribing or upgrading, you will receive a confirmation notification.
All features included in the new or upgraded plan will be immediately accessible.
With EliteSocialHub, subscribing or upgrading plans is simple, allowing you to unlock advanced tools and capabilities to streamline your social media management.
Post on EliteSocialHub
How to Create a Post
The EliteSocialHub platform allows users to create, schedule, and post content seamlessly across multiple social media platforms.
Follow the steps below to create a post:
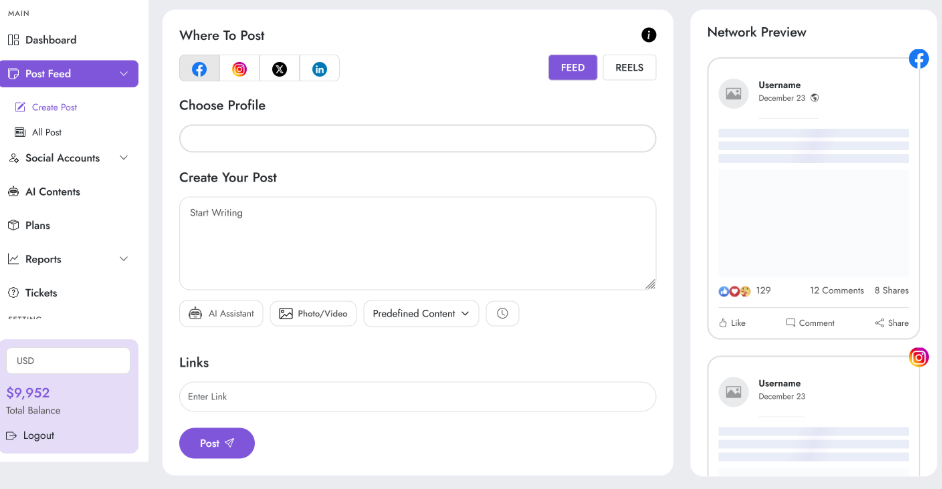
Click on Post Feed from the left-hand sidebar menu.
Select Create Post to open the post creation interface.
Choose the platforms where you want to publish your post (e.g., Facebook, Instagram, Twitter, LinkedIn).
Toggle between Feed and Reels depending on the type of content you want to create.
Select the specific social media profile from the dropdown list for the chosen platform.
Write your post content in the Create Your Post text box.
Use the AI Assistant to generate or enhance content ideas for your post.
Attach images or videos by clicking the Photo/Video button.
Use Predefined Content for pre-saved templates or predefined text options.
Schedule your post by clicking the clock icon to set a specific date and time for posting.
Include any relevant URLs in the Links section to direct your audience to external content.
View a preview of your post in the Network Preview section on the right-hand side.
Once satisfied, click the Post button to publish immediately or schedule it for later.
With EliteSocialHub, creating and managing social media content is simple and efficient, enabling users to maximize their reach and engagement effortlessly.
Facebook Platform Configuration
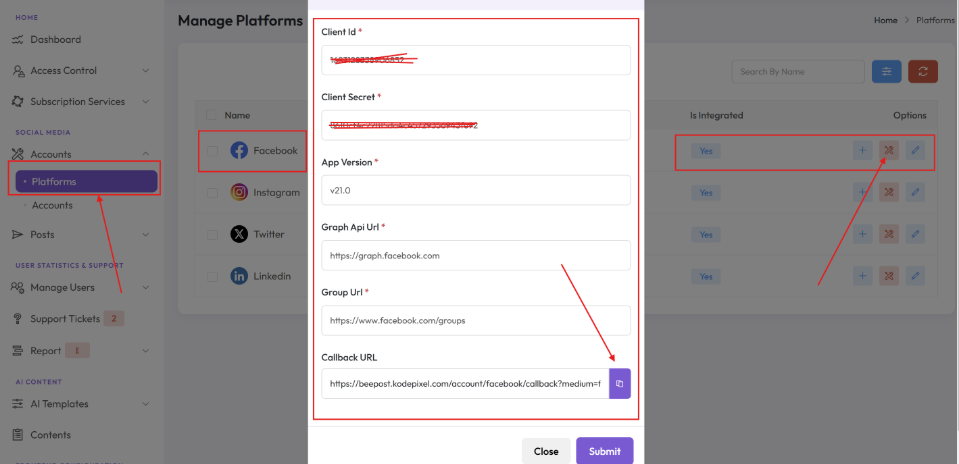
To configure the Facebook platform in BeePost, follow these steps to integrate your Facebook account seamlessly.
Steps to Configure:Navigate to the Platforms section in the EliteSocialHub dashboard and locate the Facebook platform in the list.
Click on the Settings button (settings icon) under the "Options" column for the Facebook platform.
A modal titled Update Configuration will appear, displaying the following fields:
Client ID: Enter the Client ID from your Facebook developer account.
Client Secret: Enter the Client Secret from your Facebook developer account.
App Version: Specify the API version (e.g., v21.0).
Graph API URL: The default URL is https://graph.facebook.com.
Group URL: The default URL is https://www.facebook.com/groups.
Callback URL: Copy this URL using the copy button provided and paste it into your Facebook app's configuration in the Facebook Developer account.
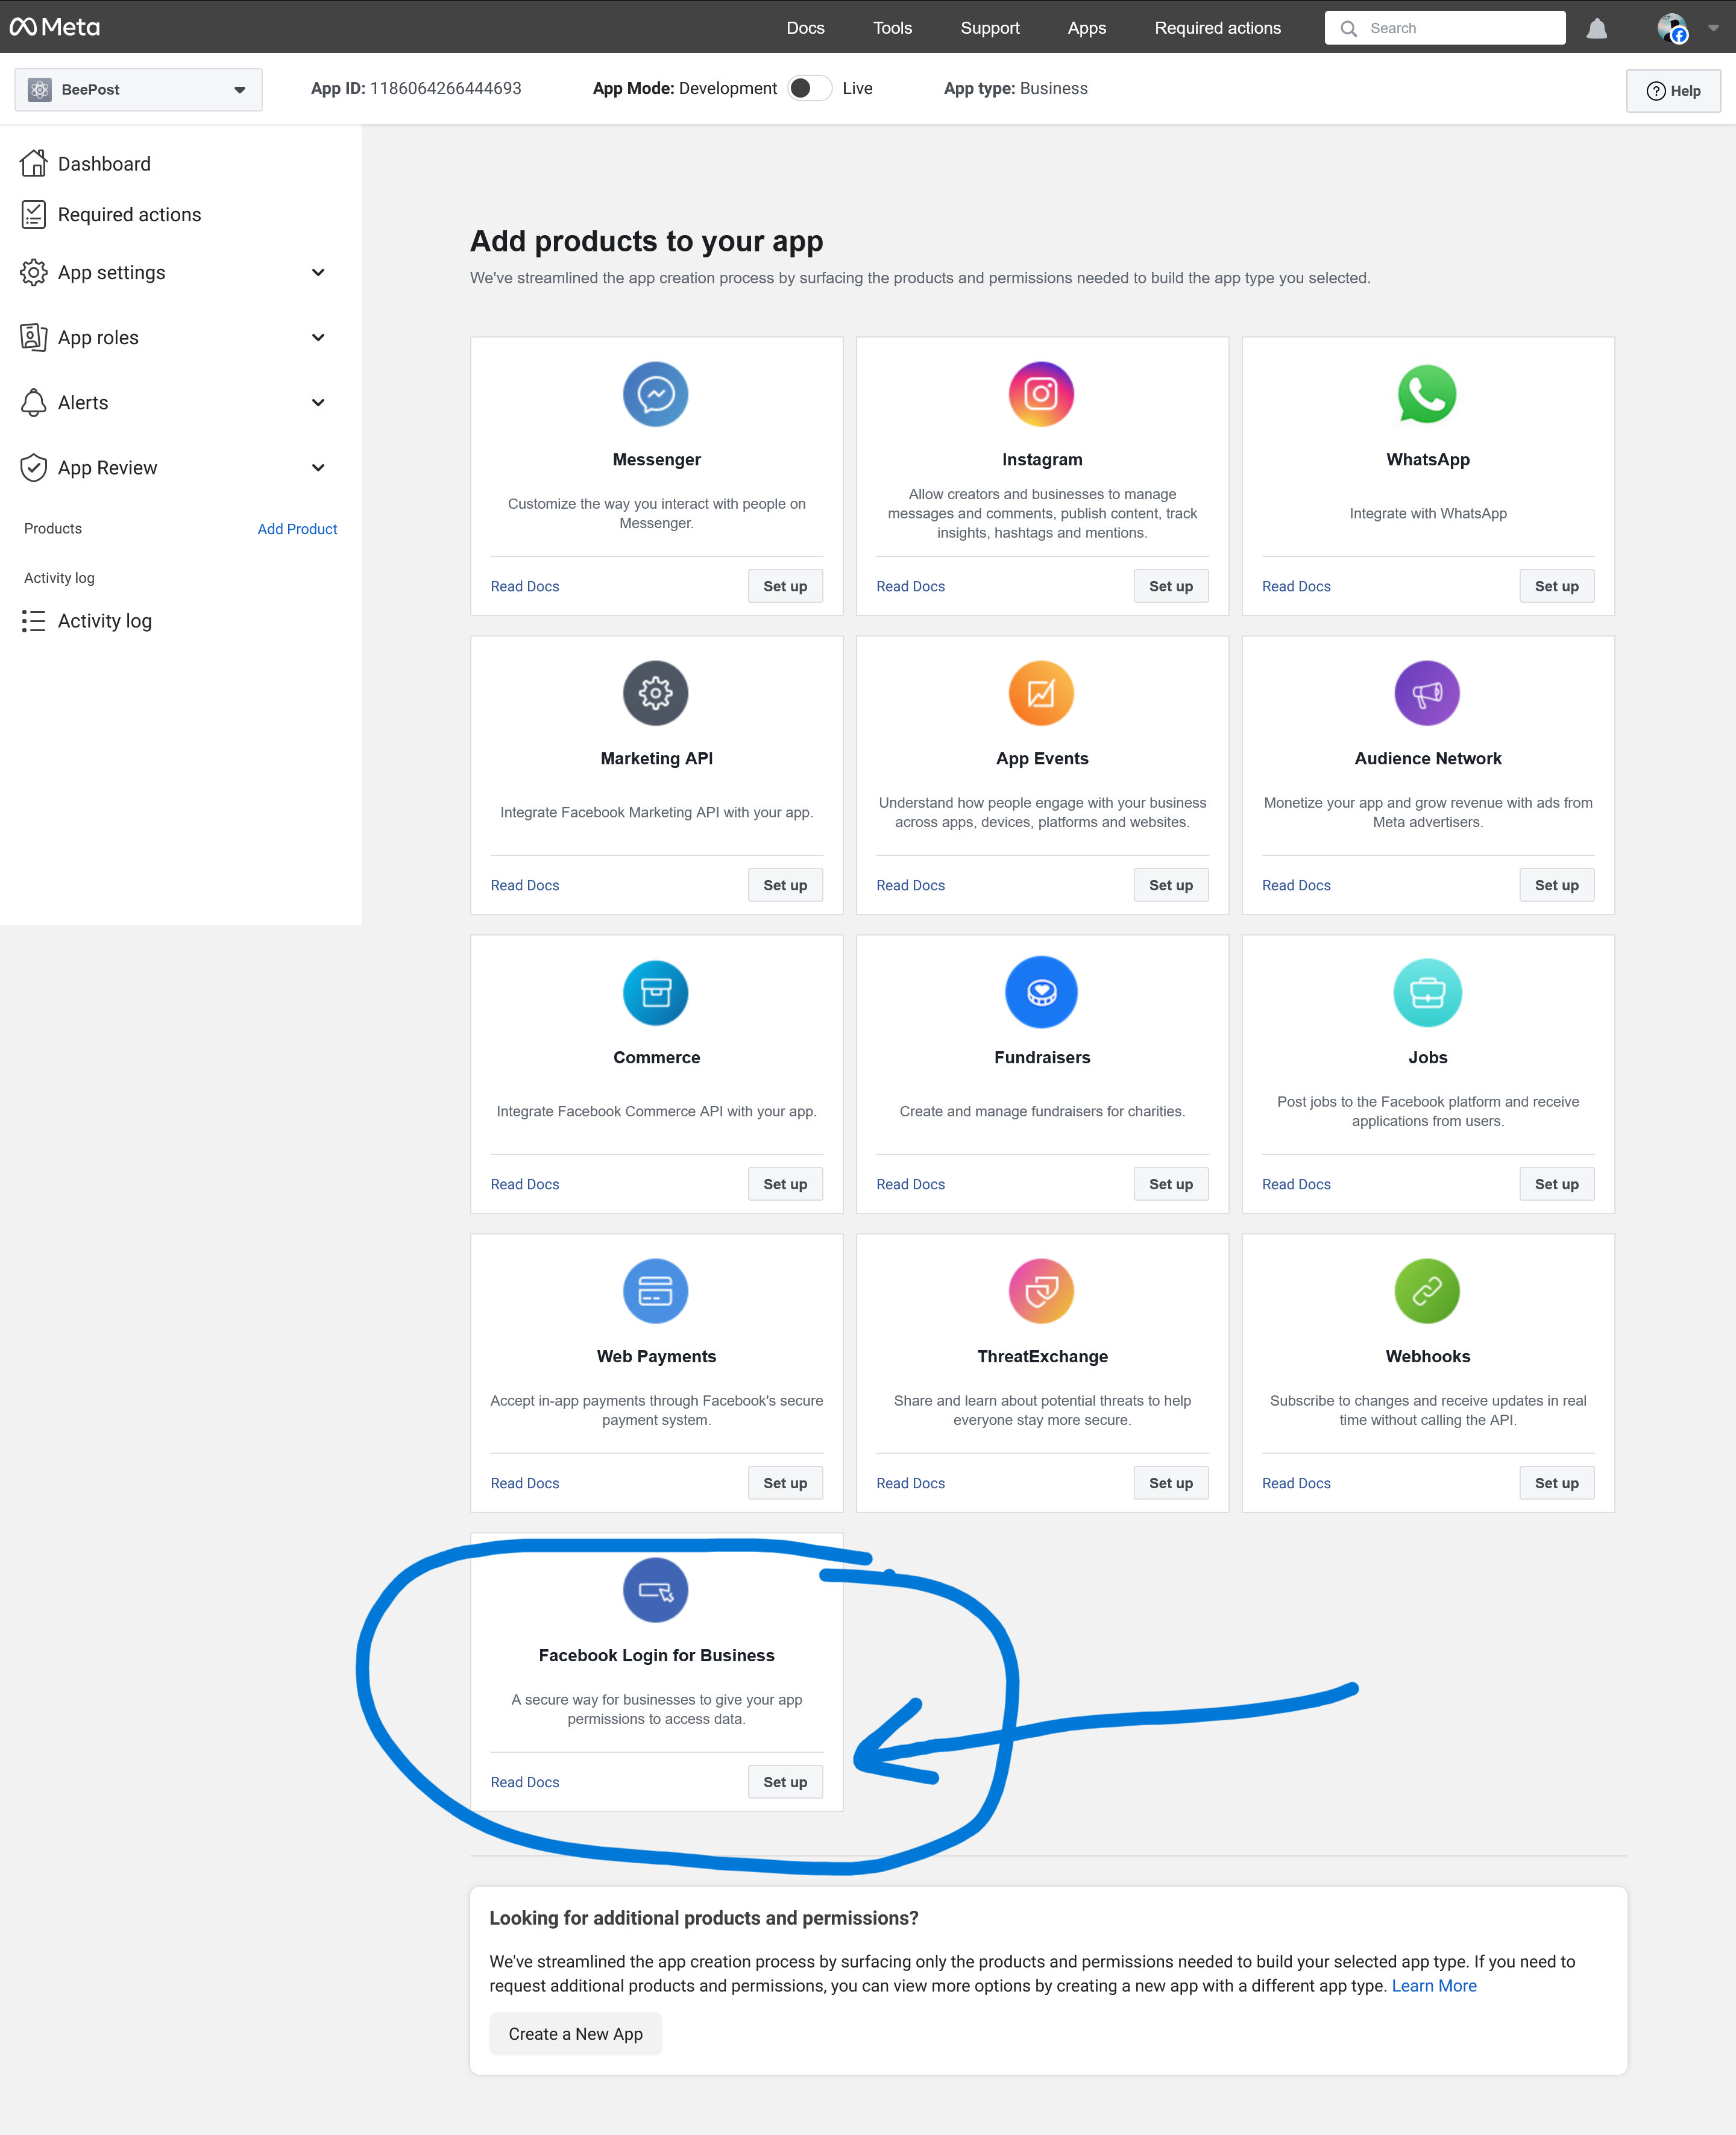
Next Step: Create a Facebook AppTo find the required Client ID and Client Secret, you need to create a Facebook App.
Follow these steps:


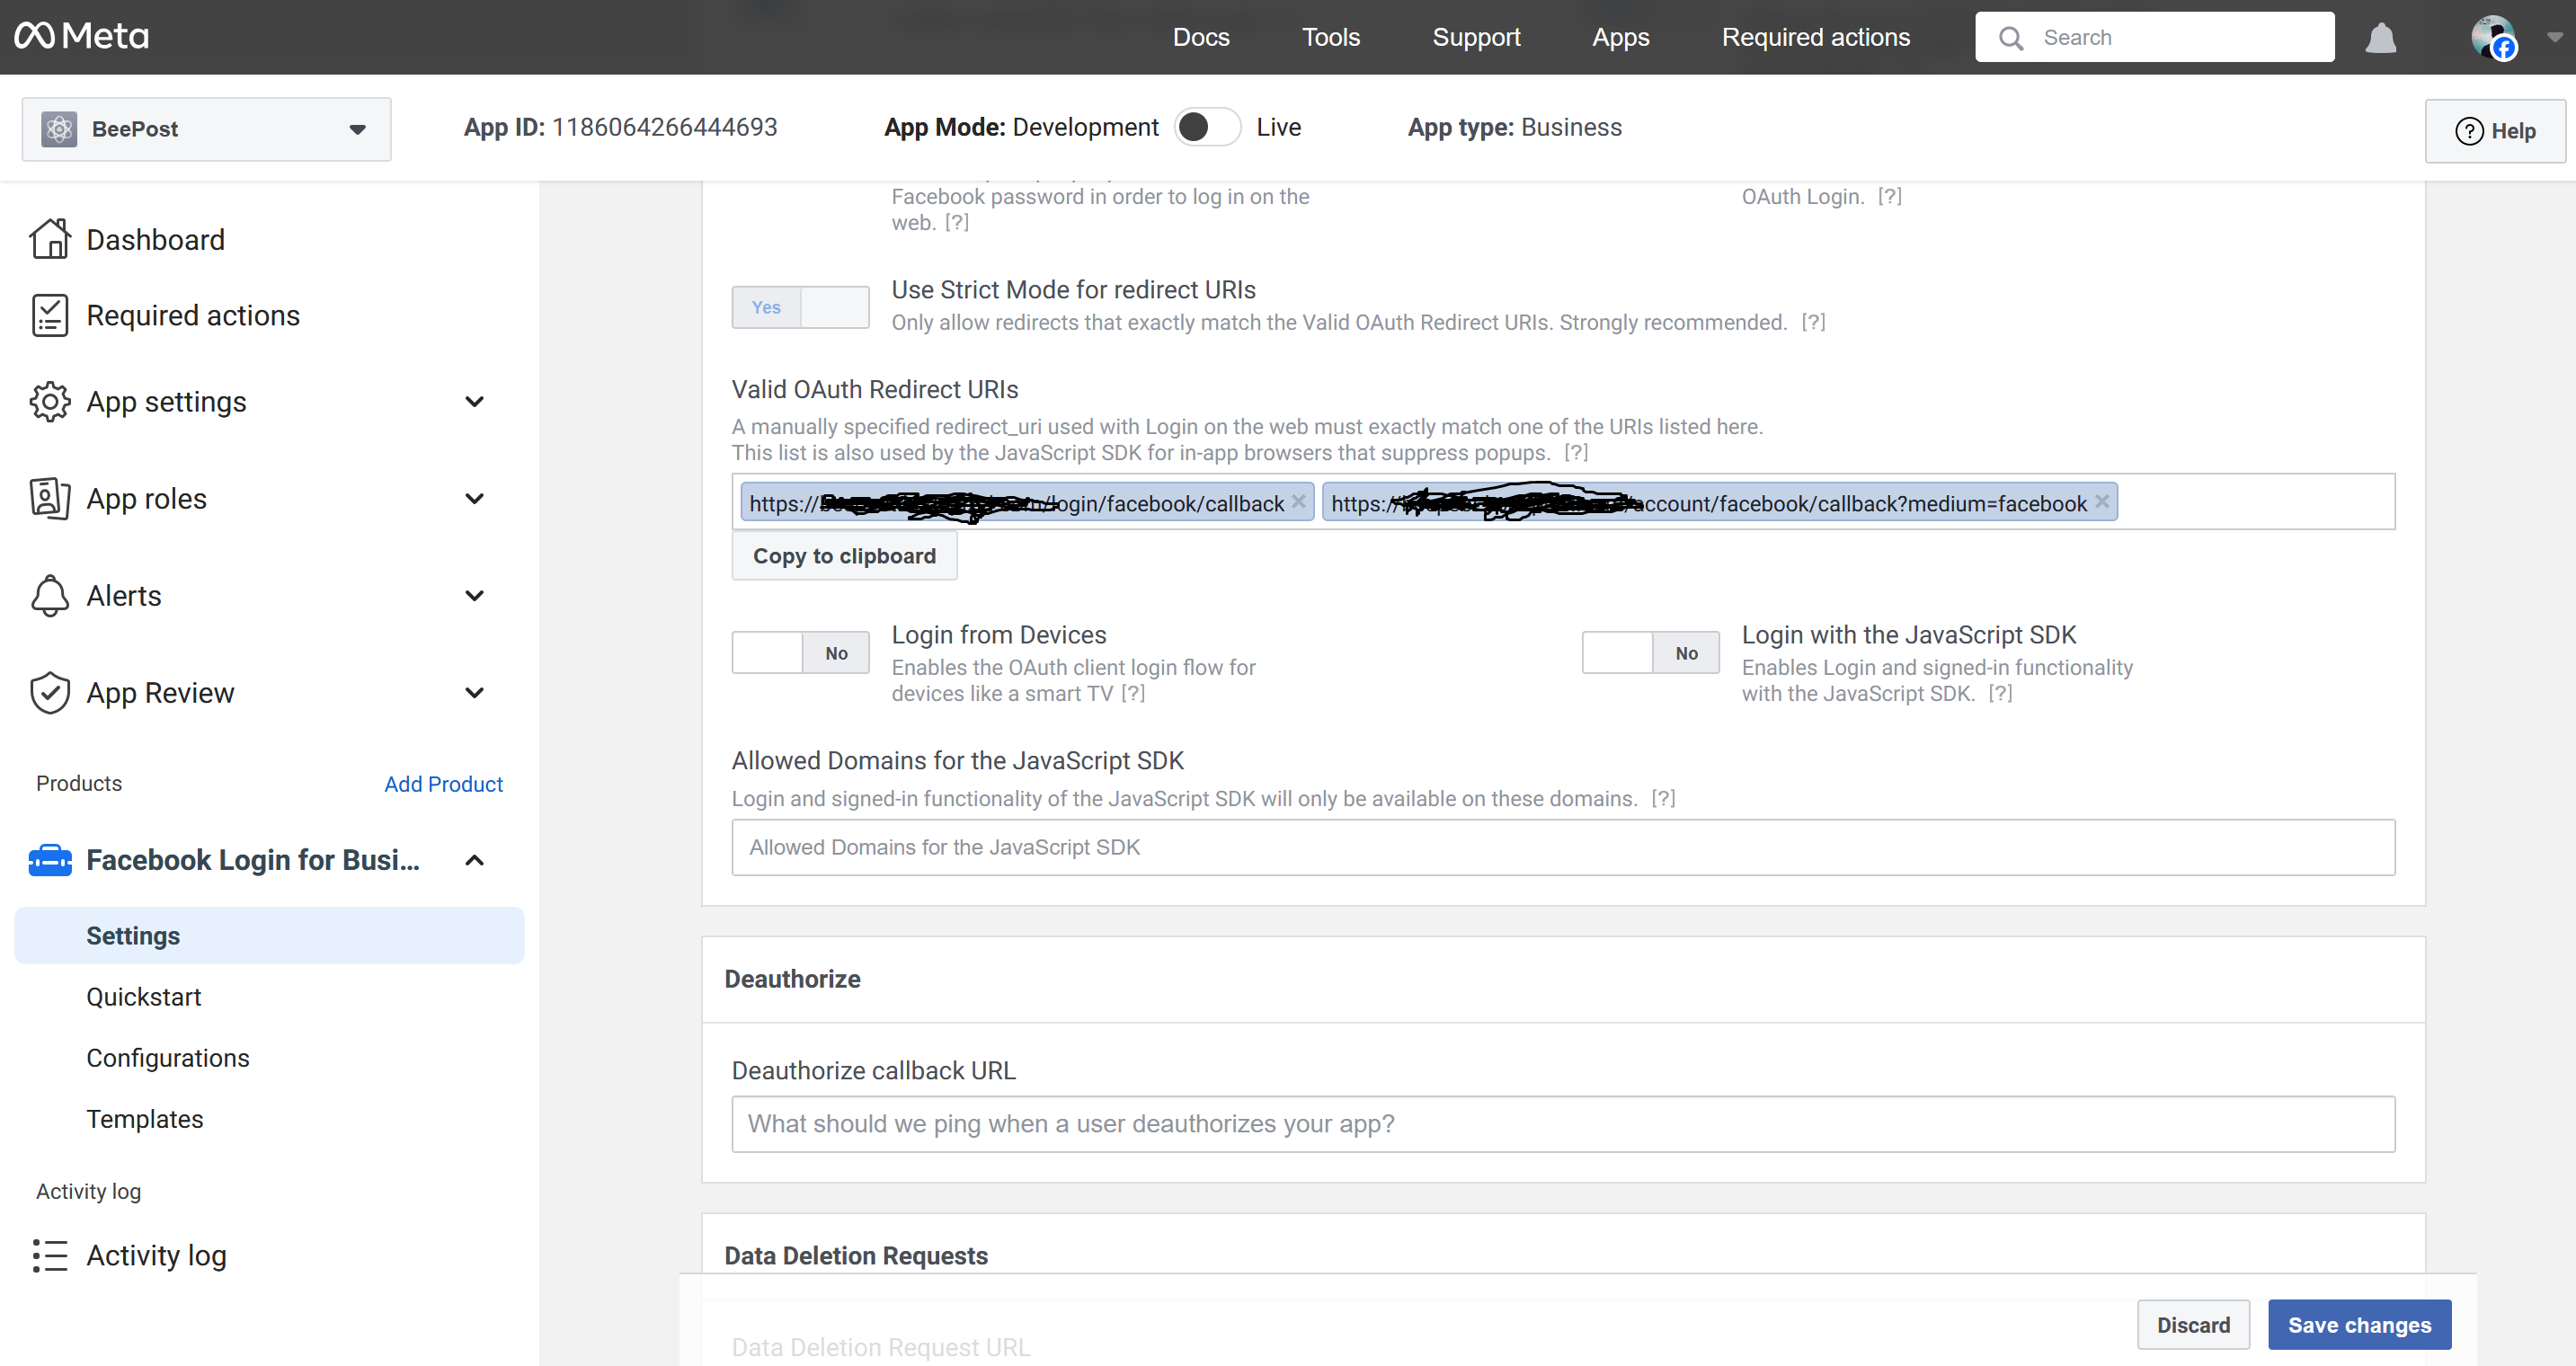
The OAuth2 Redirect URI is the location where the provider will redirect users after attempting to log in or authenticate their social accounts.
You need to configure the following two callback URLs in your Facebook App's settings:Required Callback URLs:
For Login:
https://your-hosted-domain.com/login/facebook/callback
For Social Account Connectivity:https://your-hosted-domain.com/account/facebook/callback?medium=facebook
Examples Based on Environment:If running on a production server:
Use the above URLs exactly as they are with
https://your-hosted-domain.com.If running locally:
Replace the base URL with
http://localhost:4200. For example:
Login Callback:
http://localhost:4200/login/facebook/callback
Social Account Connectivity Callback: http://localhost:4200/account/facebook/callback?medium=facebook
Request Advanced Permissions for Facebook Integration
These permissions will allow EliteSocialHub to manage pages, retrieve insights, and handle posts on your behalf.
Required Scopes:
Go to the Advanced Permission section in your Facebook App and request access for the following scopes:
pages_show_list business_management pages_manage_posts pages_manage_engagement pages_read_engagement read_insights
Now, Goto the App Settings > Basic. Now you can found the App ID/Client ID & App Secret/Client Secret.
Note: Here App domain, privacy policy, terms and service url provide must for go live mode
Once your app is review from Meta and you provided the all information correctly then you just click to development to live

Instagram Platform Configuration
NOTE: Please be advised that Instagram and Facebook can use the same app (no need to create two separate apps).
Steps to Configure:
Navigate to the Platforms section in the EliteSocialHub dashboard and locate the Facebook platform in the list.
Click on the Settings button (settings icon) under the "Options" column for the Facebook platform.
A modal titled Update Configuration will appear, displaying the following fields:
Client ID: Enter the Client ID from your Facebook developer account.
Client Secret: Enter the Client Secret from your Facebook developer account.
App Version: Specify the API version (e.g., v21.0).
Graph API URL: The default URL is https://graph.facebook.com.
Group URL: The default URL is https://www.facebook.com/groups.
Callback URL: Copy this URL using the copy button provided and paste it into your Facebook app's configuration in the Facebook Developer account.
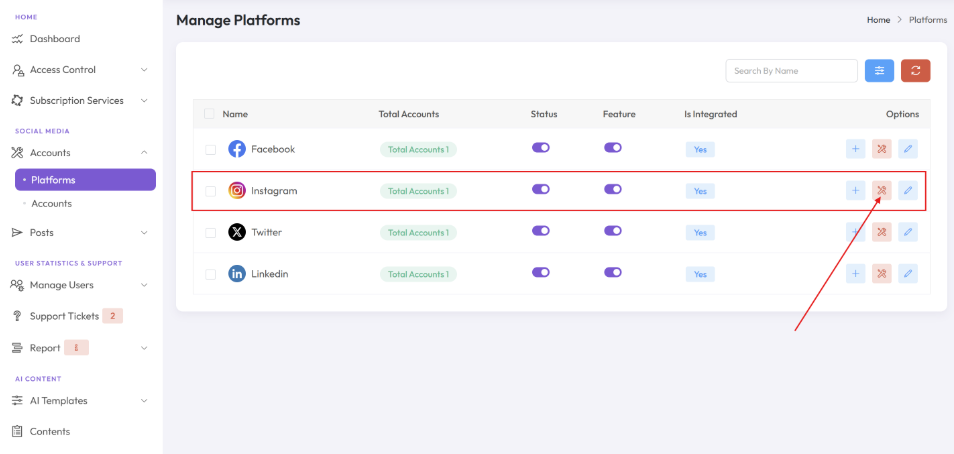
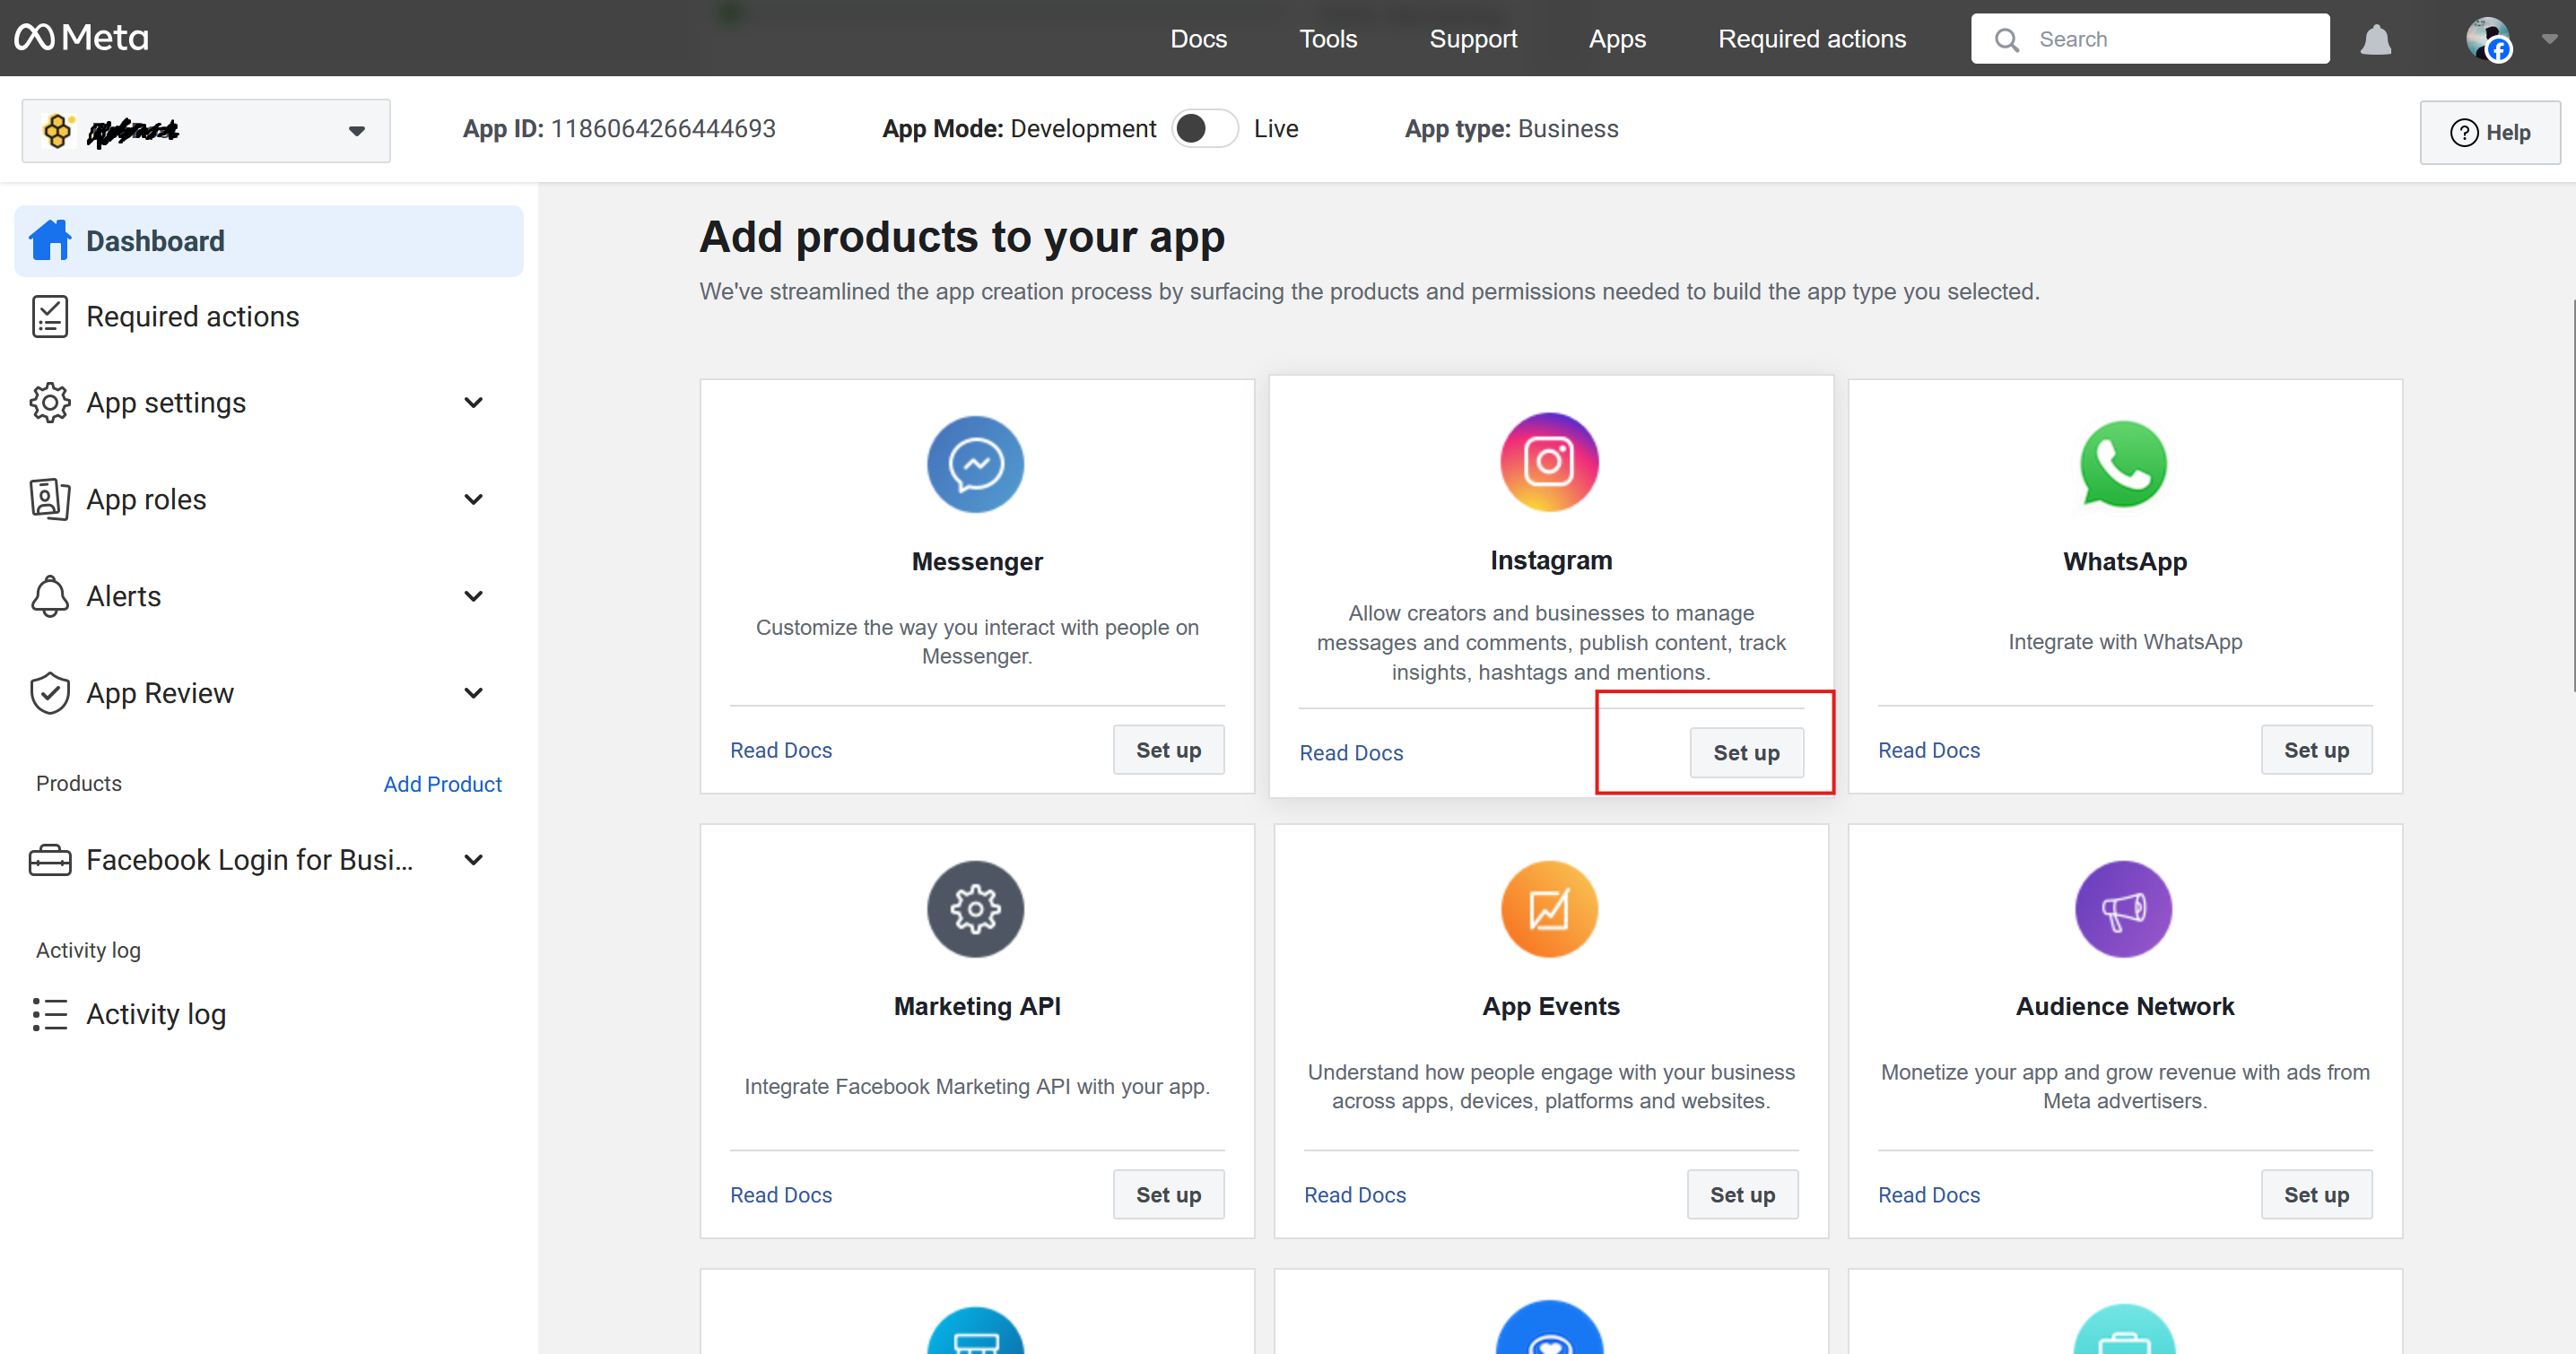
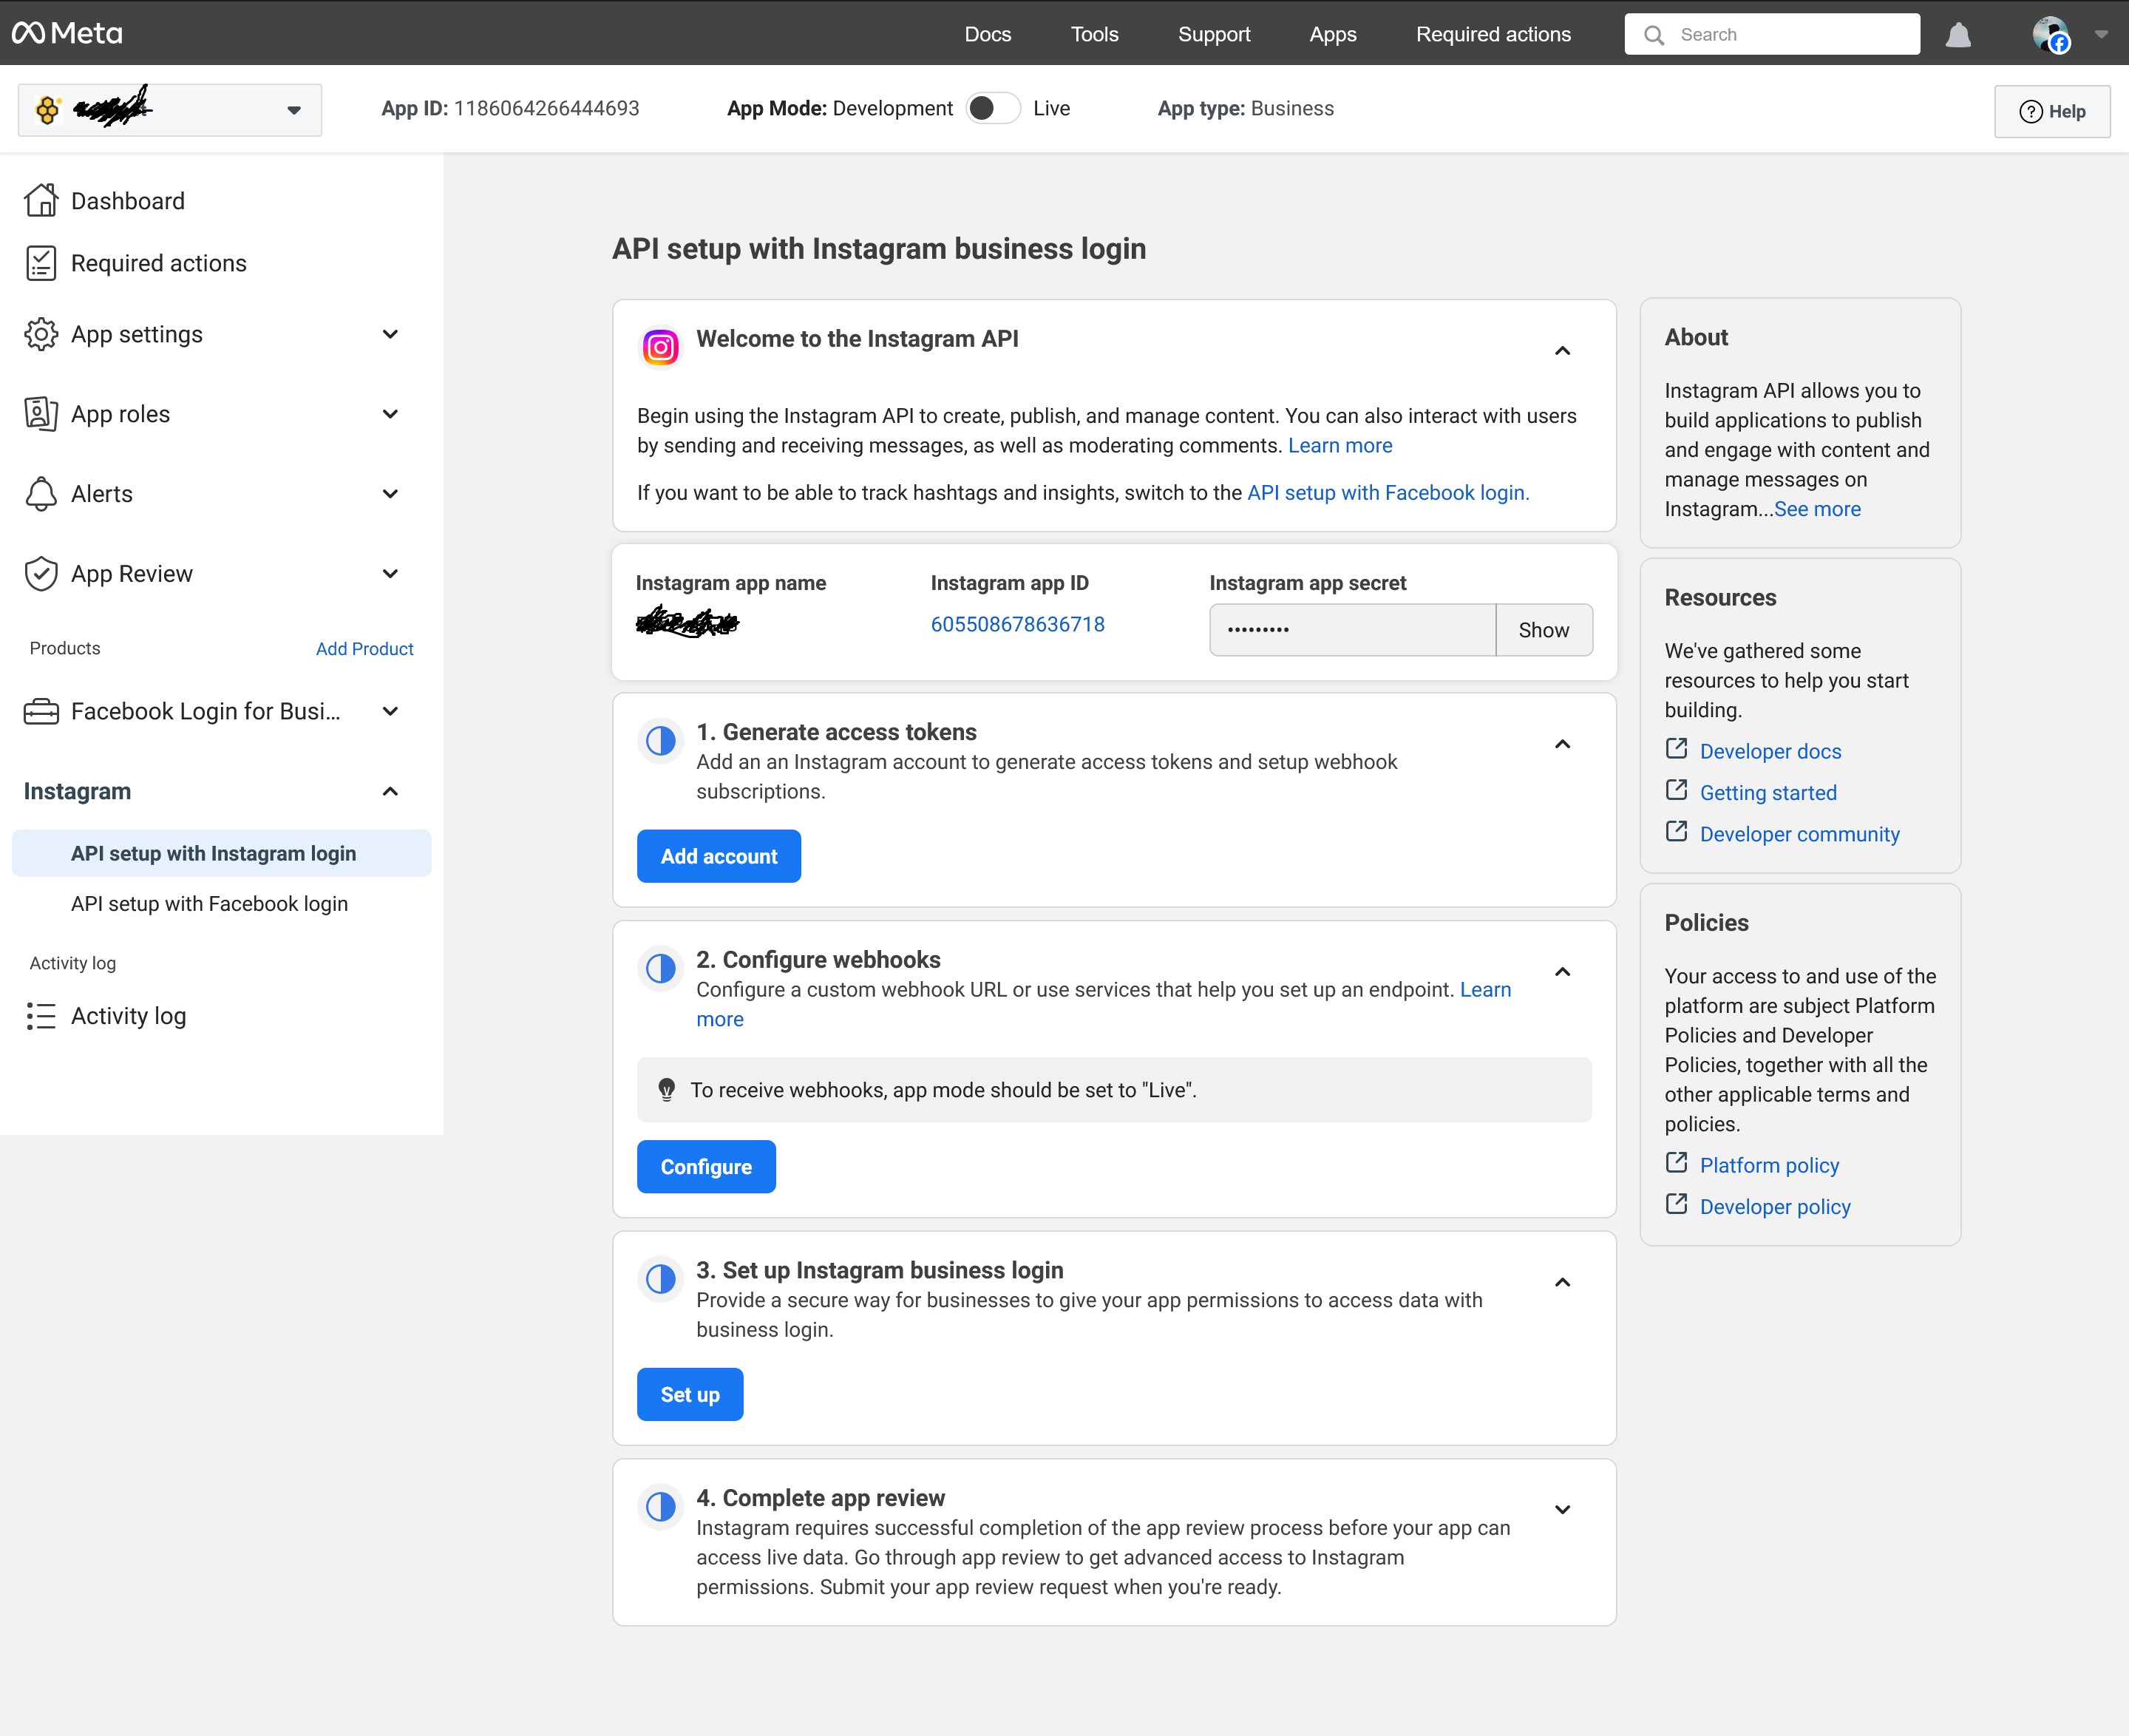
Follow these steps to set up the Instagram API for Business Login in your Meta Developer account.
This process allows you to use the Instagram API to create, publish, and manage content, interact with users, and moderate comments.Steps for API Setup:
Generate Access Tokens:
Add an Instagram account to generate access tokens and set up webhook subscriptions. Click on the Add Account button to link your Instagram account.
Configure Webhooks:
Set up a custom webhook URL or use services that help you create an endpoint. Ensure the app mode is set to Live to receive webhooks. Click the Configure button to set this up.
Set Up Instagram Business Login:
Provide a secure way for businesses to grant your app permissions to access data using Instagram Business Login. Click the Set Up button to configure this.
Complete App Review:
To access live data, your app must successfully complete the app review process. Go through the review to request advanced access to Instagram permissions. Submit your app for review when you are ready.Important Information:I
nstagram App Name: EliteSocialHub-IG
Instagram App ID: 605508678636718
Instagram App Secret: [Hidden for security]
Refer to the Meta Developer documentation for more details:
Instagram API Documentation
LinkedIn Platform Configuration
Follow these steps to create and configure a LinkedIn developer app for integrating BeePost with LinkedIn pages.
Step 1: Create a LinkedIn Developer AppGo to the
LinkedIn Developer Portal and log in to your account.
Click on the My Apps button in the top-right corner, as highlighted in the screenshot.

Click Create App and fill in the required fields:
App Name: Enter a suitable name for your app.
LinkedIn Page: Provide your company's LinkedIn page URL (e.g., https://www.linkedin.com/company/your-company-name/).
Privacy Policy URL: Provide a valid URL for your privacy policy (e.g., https://yourwebsite.com/privacy-policy).
App Logo: Upload a logo for your app (minimum dimensions: 100px).
Legal Agreement: Check the box to agree to LinkedIn's API Terms of Use.

Click Create App to complete the creation process.
Step 2: Add Products
Navigate to the Products tab of your app.
Add the following products:
Share on LinkedIn: Enables sharing content on LinkedIn.
Sign In with LinkedIn: Allows authentication using LinkedIn credentials.
If additional products like the Advertising API are needed, request access from LinkedIn.

Step 3: Configure Authentication
Navigate to the Auth tab of your app.
Copy the following details:
Client ID: Unique identifier for your app.
Client Secret: Secure key for authentication. You can generate a new one if needed.
Set the Authorized Redirect URLs for your app: https://app.elitesacco.com/account/linkedin/callback
Save the changes.

Step 4: Finalize the Setup
Ensure all settings are correctly configured, and the app status is set to Live.
Use the Client ID, Client Secret, and redirect URL to integrate EliteSocialHub with LinkedIn through the EliteSocialHub platform.Setup to EliteSocialHub LinkedIn Config Info
Now provide all the necessary fields from the LinkedIn Developer account's created app
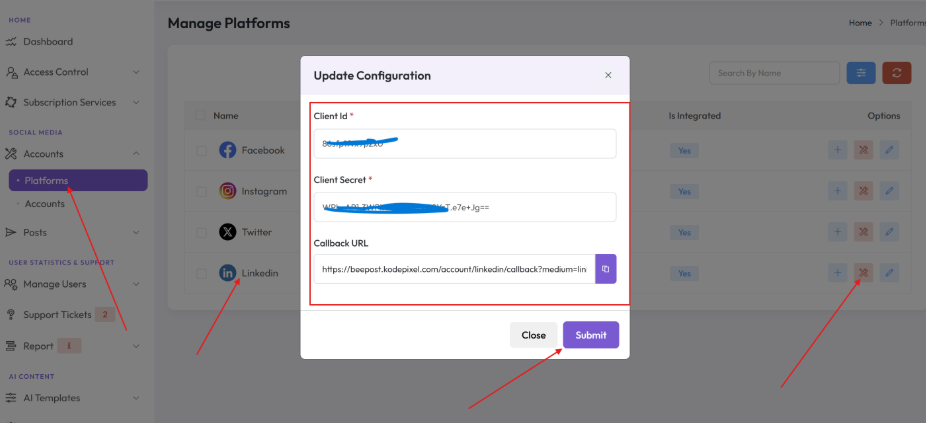
For more details, refer to the official LinkedIn Developer Documentation.
X/Twitter Platform Configuration
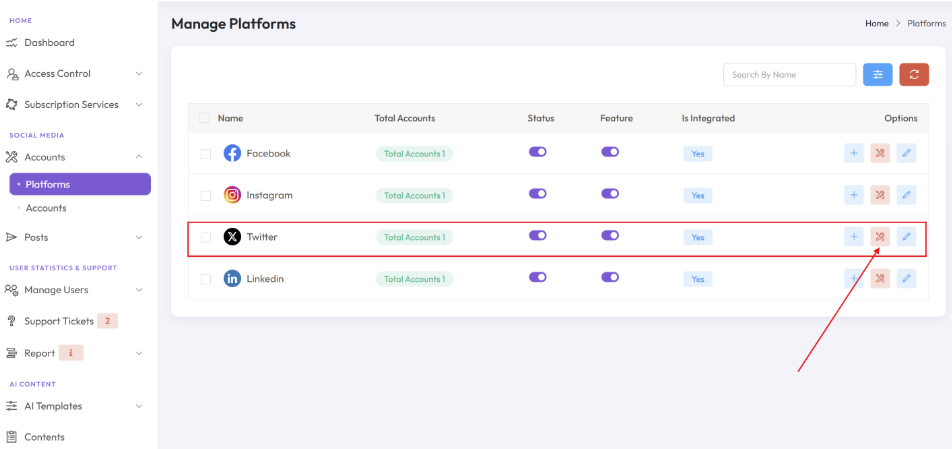
Steps to Configure:Navigate to the Platforms section in the EliteSocialHub dashboard and locate the X/Twitter platform in the list.
Click on the Settings button (settings icon) under the "Options" column for the Facebook platform.
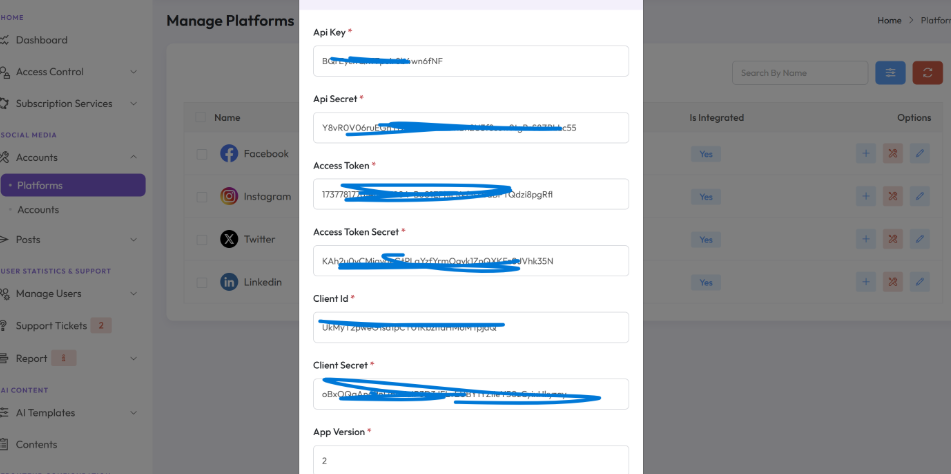
A modal titled Update Configuration will appear, displaying the following fields:
API Key: Enter the API Key provided by your LinkedIn Developer account.
API Secret: Enter the API Secret associated with your LinkedIn Developer account.
Access Token: Provide the Access Token obtained from the LinkedIn Developer account.
Access Token Secret: Provide the Access Token Secret for your LinkedIn app.
Client ID: Enter the Client ID generated by your LinkedIn Developer account.
Client Secret: Enter the Client Secret provided for your LinkedIn app.
App Version: Specify the API version to be used (e.g., v2).
Setting Up X (Twitter) Integration for EliteSocialHub
Twitter uses an OAuth2 flow for most features with its v2 API.
However, to upload pictures, the older Twitter v1 API must be used.
EliteSocialHub leverages the normal OAuth1 flow to ensure compatibility with both APIs. Follow these steps to set up the integration:
Step 1: Create a New App in Twitter Developer Portal
Head over to the Twitter Developer Portal and log in to your account.
Sign up for a new free developer account if you haven’t already.
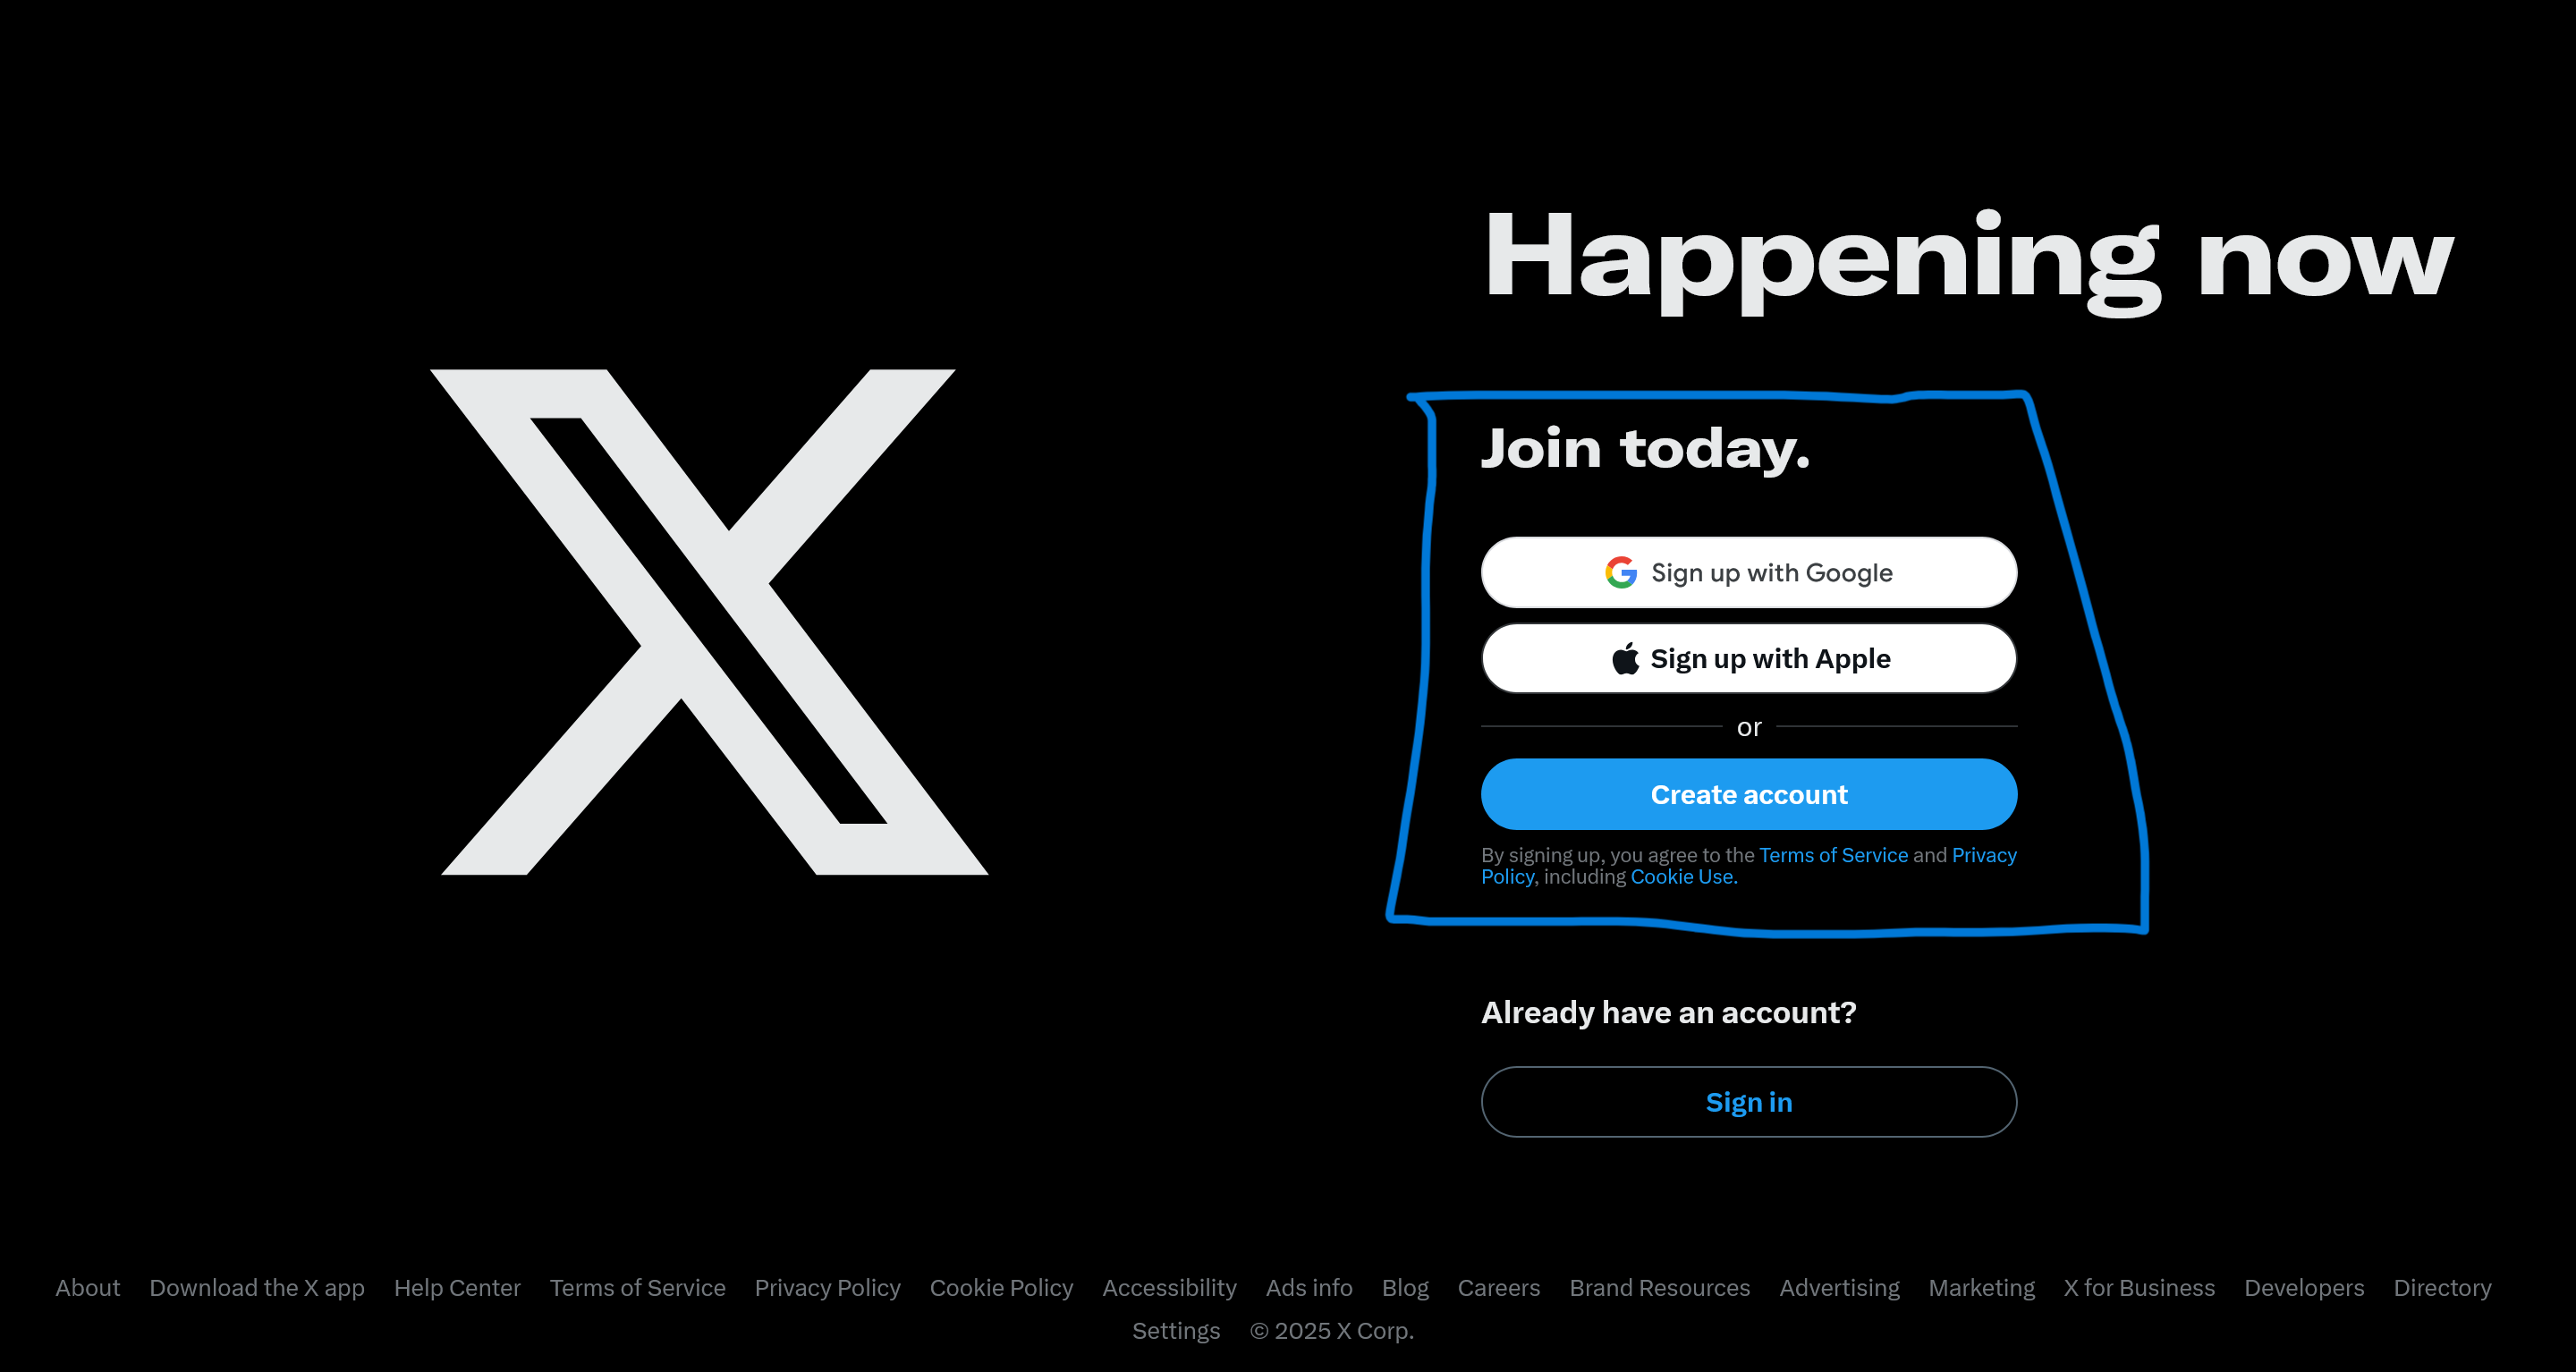
Create a new app in the "Projects & Apps" section.
Step 2: Configure Your App
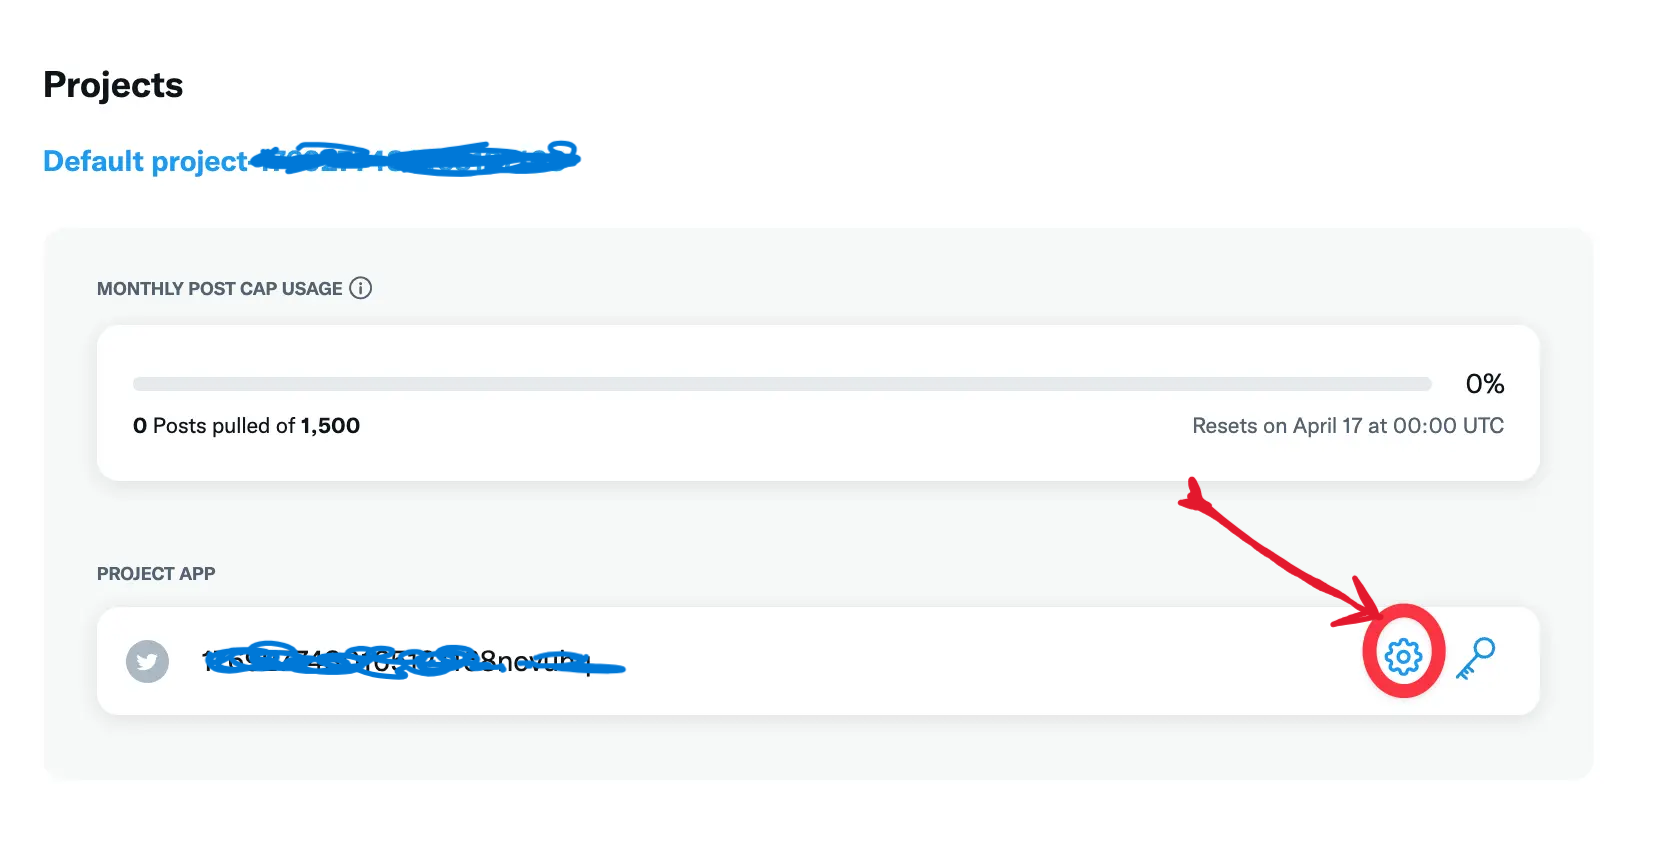
Navigate to the newly created app and click on the Settings icon.
In the User Authentication Settings, click on Set Up and follow these configurations:
App Permission: Set it to Read and Write.
Type of App: Select Web App, Automated App, or Bot.
Callback URI / Redirect URL: Enter the following URL:https://app.elitesacco.com/account/twitter/callback?medium=twitter

Save the settings.
Step 3: OAuth2 Redirect URI
The OAuth2 Redirect URI is the location where Twitter will redirect after authentication. Use the URL specific to your setup:
For production: Replace https://app.elitesacco.com/account/twitter/callback?medium=twitter
For localhost (development): Replace app.elitesacco.com with your local development URL (e.g., http://localhost:4200/account/twitter/callback?medium=twitter).
Step 4: Obtain Keys and TokensGo to the Keys and Tokens tab in your app settings.
Copy the following credentials for use in EliteSocialHub:API Key
API Secret
Access Token
Access Token Secret
Step 5: Finalize and Save
Once you have completed the setup and entered the credentials in ElitesocialHub’s platform configuration, save the settings.
